RCVx3 Powering the Device with a Backup Battery (UPS)
What You Need
• RCVx3
device • Backup battery •
Power adapter
• \RJ-11 phone
cable • (Optional) Ethernet cable
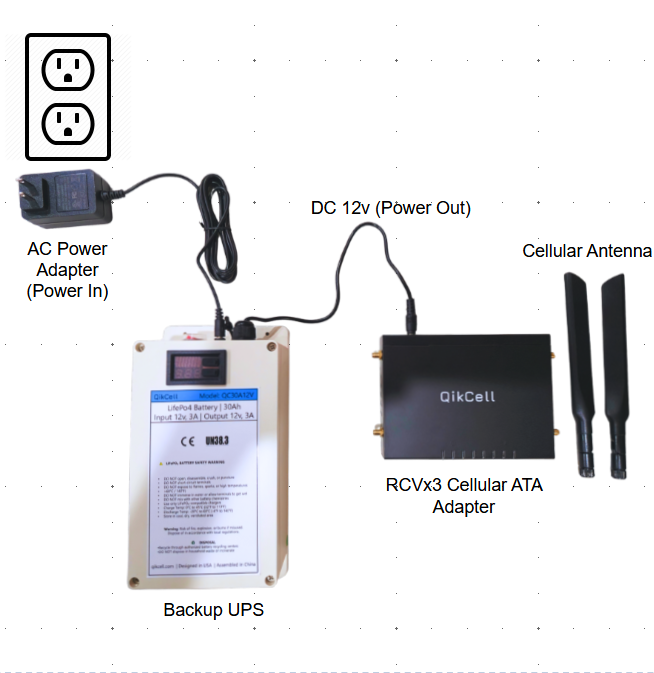
Connect & Power On
1. Place the backup battery
near the RCVx3 on a stable
surface.
2. Plug the AC adapter
into a wall outlet and into the battery’s INPUT.
3. Connect the battery’s 12V DC OUTPUT to the RCVx3 Power port (DC IN).
4. Move the battery’s power switch to ON. The battery LED should be solid.
5. Wait
~30 seconds for the RCVx3 Power LED to turn solid.
6. Connect the RJ 11 phone cable from FXS1 on the RCVx3 to
your phone/call box.
7. (Optional) If your setup requires network,
connect Ethernet to your LAN.
Verify Service
• Allow 1–2
minutes for network registration.
• Place
a normal outbound call and confirm two-way audio.
Quick Troubleshooting
- No power:
Ensure the battery is charged/on and the DC plug is fully seated.
- No dial tone: Confirm
the RJ 11 is connected to FXS1 and try a known good
cable.
Connections Overview
Related Articles
How to make changes in Proxy/ Registration on FXS_1/ FXS_2 in RCVx3 device
To make changes in Proxy/ Registration of RCVx3 device please follow the steps below: 1. Log in to your PhoneMDM account at phonemdm.com. 2. Click the below shown Icon to get into the settings of the required device. 3. After accessing the device ...How to check Syslogs in RCVx3 device.
To check the System Logs, follow these steps: 1. Open a web browser and enter the URL of the RCVx3 device: 192.168.3.1 2. If you are logging in for the first time, use the default credentials: Username: celestial Password: hellotickiot 3. Select the ...Factory reset the device from Local UI
A factory reset returns the device back to its default factory settings, i.e., it deletes all custom configurations. Below you will find a method of performing a factory reset on RCVx3. To configure Factory Reset using Local UI please follow the ...How to Factory reset the RCVx3 device Remotly using PhoneMDM
To remotely factory reset the RCVx3 device using PhoneMDM, please follow the steps below. 1. Log in to your PhoneMDM account at phonemdm.com. 2. Click the below shown Icon to get into the settings of the required device. 3. After accessing the device ...How Set SIP Advance Setup on FXS_1/ FXS_2 In RCVx3 device
1. Log in to your PhoneMDM account at phonemdm.com. 2. Click the below shown Icon to get into the settings of the required device. 3. After accessing the device configuration settings, select the FXS_1 or FXS_2 option, which is the first and second ...